I regularly get asked how I made certain mobile photo I took look the way it does and instead of gradually explaining it in a vague (and probably useless) manner on in my image posts, I thought I would start a series of posts about it.
Because of my busy schedule at work and at home (two kids) I’ve had to re-orient my passion for photography to my iPhone (and leave my Canon 5D Mark II at home). So I thought I might as well make mobile photography a real thing, with great post processing, on the mobile.
So without further ado, let’s get into how I post process my images on my mobile.
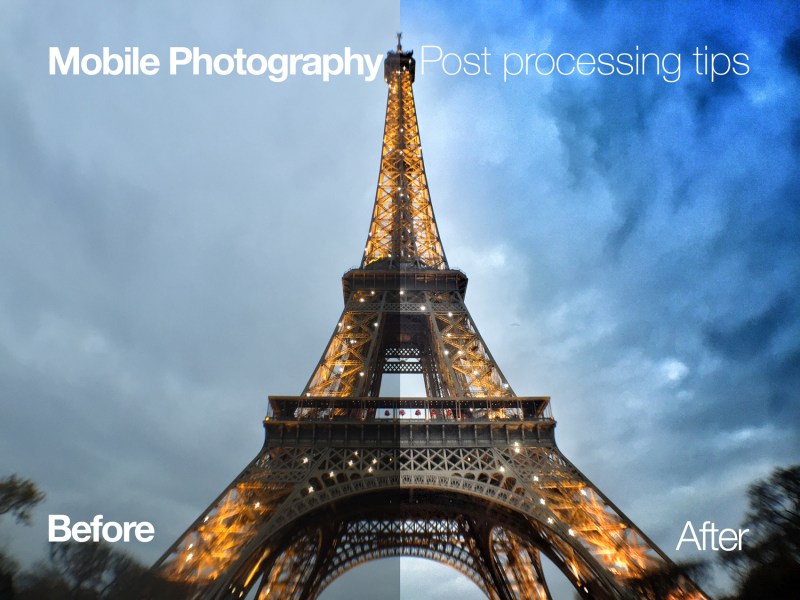
The above image was taken on a cloudy day in the late afternoon. Eiffel Tower is a bit of a tricky subject to shoot, not just because she has been shot so many times but because she is so tall. So one often ends up shooting portrait or cutting a lot of the tower. In this image I solved that using a wide-angle pocket lens fitting the tower in the frame quite well, although I admit I would have prefered the 16:1 ratio than 4:3 but that’s another story.
I post process my images mainly on Snapseed which is an excellent free app that gives quite a lot of options. This post is about Snapseed and more specifically this Eiffel Tower photo. It doesn’t cover all you can do with Snapseed and I’ll cover more options in future posts.
First step: Snapseed Drama filter

See the before and after using the Drama effect.
I love this effect, in fact it has replaced any HDR stuff for most of my pictures. There are a couple of points to watch out for when using the Drama filter.
- When using the filter on clouds it works particularly well. However it can rapidly turn your clouds totally black, which I don’t like too much.
- Unfortunately, and there’s not much to do about it except reduce the filter strength it tends to make a glow around objects, as you can see on the Eiffel Tower image above. Again the only solution is to reduce the filter strength.
When using Drama it tends to reduce the saturation, which is pretty cool in some pictures, but for this one, considering that it was a cloudy afternoon and I wanted a bit of blue sky – I pushed the saturation back up.
You need to play around with Drama and Saturation until you are happy.

The Tune Image set in Snapseed is your global image control, brightness, exposure, saturation, shadows etc.
Second Step: Tune Image
Once I’m comfortable with the image I head to Tune Image and start making some global adjustments, Mainly I work on the shadows and play around with that. In this picture I found the Eiffel Tower structure too dark, so by playing with the shadows I lightened up the structure without loosing that cool sky.
As a note the cloud formation and it’s circular “wreath” on the Eiffel Tower is a side-effect of the wide-angle lens, which I quite like. It tends to focus the attention onto the center of the image.
I also played around with the saturation some more but not too much. It is pretty heavy on the saturation already, I just worked on getting a more “golden” look on the tower itself.
As you can see here, I pushed the shadows to +30 to clear up the Eiffel Tower which I like better.

Use the various settings in Tune Image to change the shadows, saturation etc. In this image the shadows were taken down to lighten the Eiffel Tower.
There are many more functions in the Tune Image that you can use, for this image I didn’t use them. I have noticed that once you have done the “Drama” then trying to use contrast or brightness doesn’t really add to the image, that’s my personal opinion.
Instagram has a great tweak on the shadows, with their app one can tweak the shadows and the highlights which gives much better control. I hope Snapseed add that feature soon.
In the end
In the end I try to crop the image to 16:1 size, because I think it looks better, and because it fits a screen on my screensaver at home. And I often add vignetting which I feel focuses the viewer’s attention on the subject. However for this image I didn’t do it as I didn’t find it necessary.
Enjoy the full size image below. Leave comments below, it’s great to get feedback. If you want more of my mobile pics, check them out on my Flickr feed here.


Just got my first smartphone (LG G2) a few weeks ago. I had never heard of Snapseed. I’ve downloaded it and am having a lot of fun. Looking forward to more postings on this app!